众所周知SystemUI包含基本的StatusBar、VolumeBar、NavigationBar等部分,在手机开机时就已经为我们加载好,但是有时候会出现对StatusBar,DropList等进行定制化的任务,那么就需要了解SystemUI的启动流程,了解StatusBar,DropList等view是如何加载在系统界面上,下文是从SystemUI启动入口、SystemUI的加载机制以及以StatusBar为例来分析整个流程。下图为SystemUI启动的整个时序图: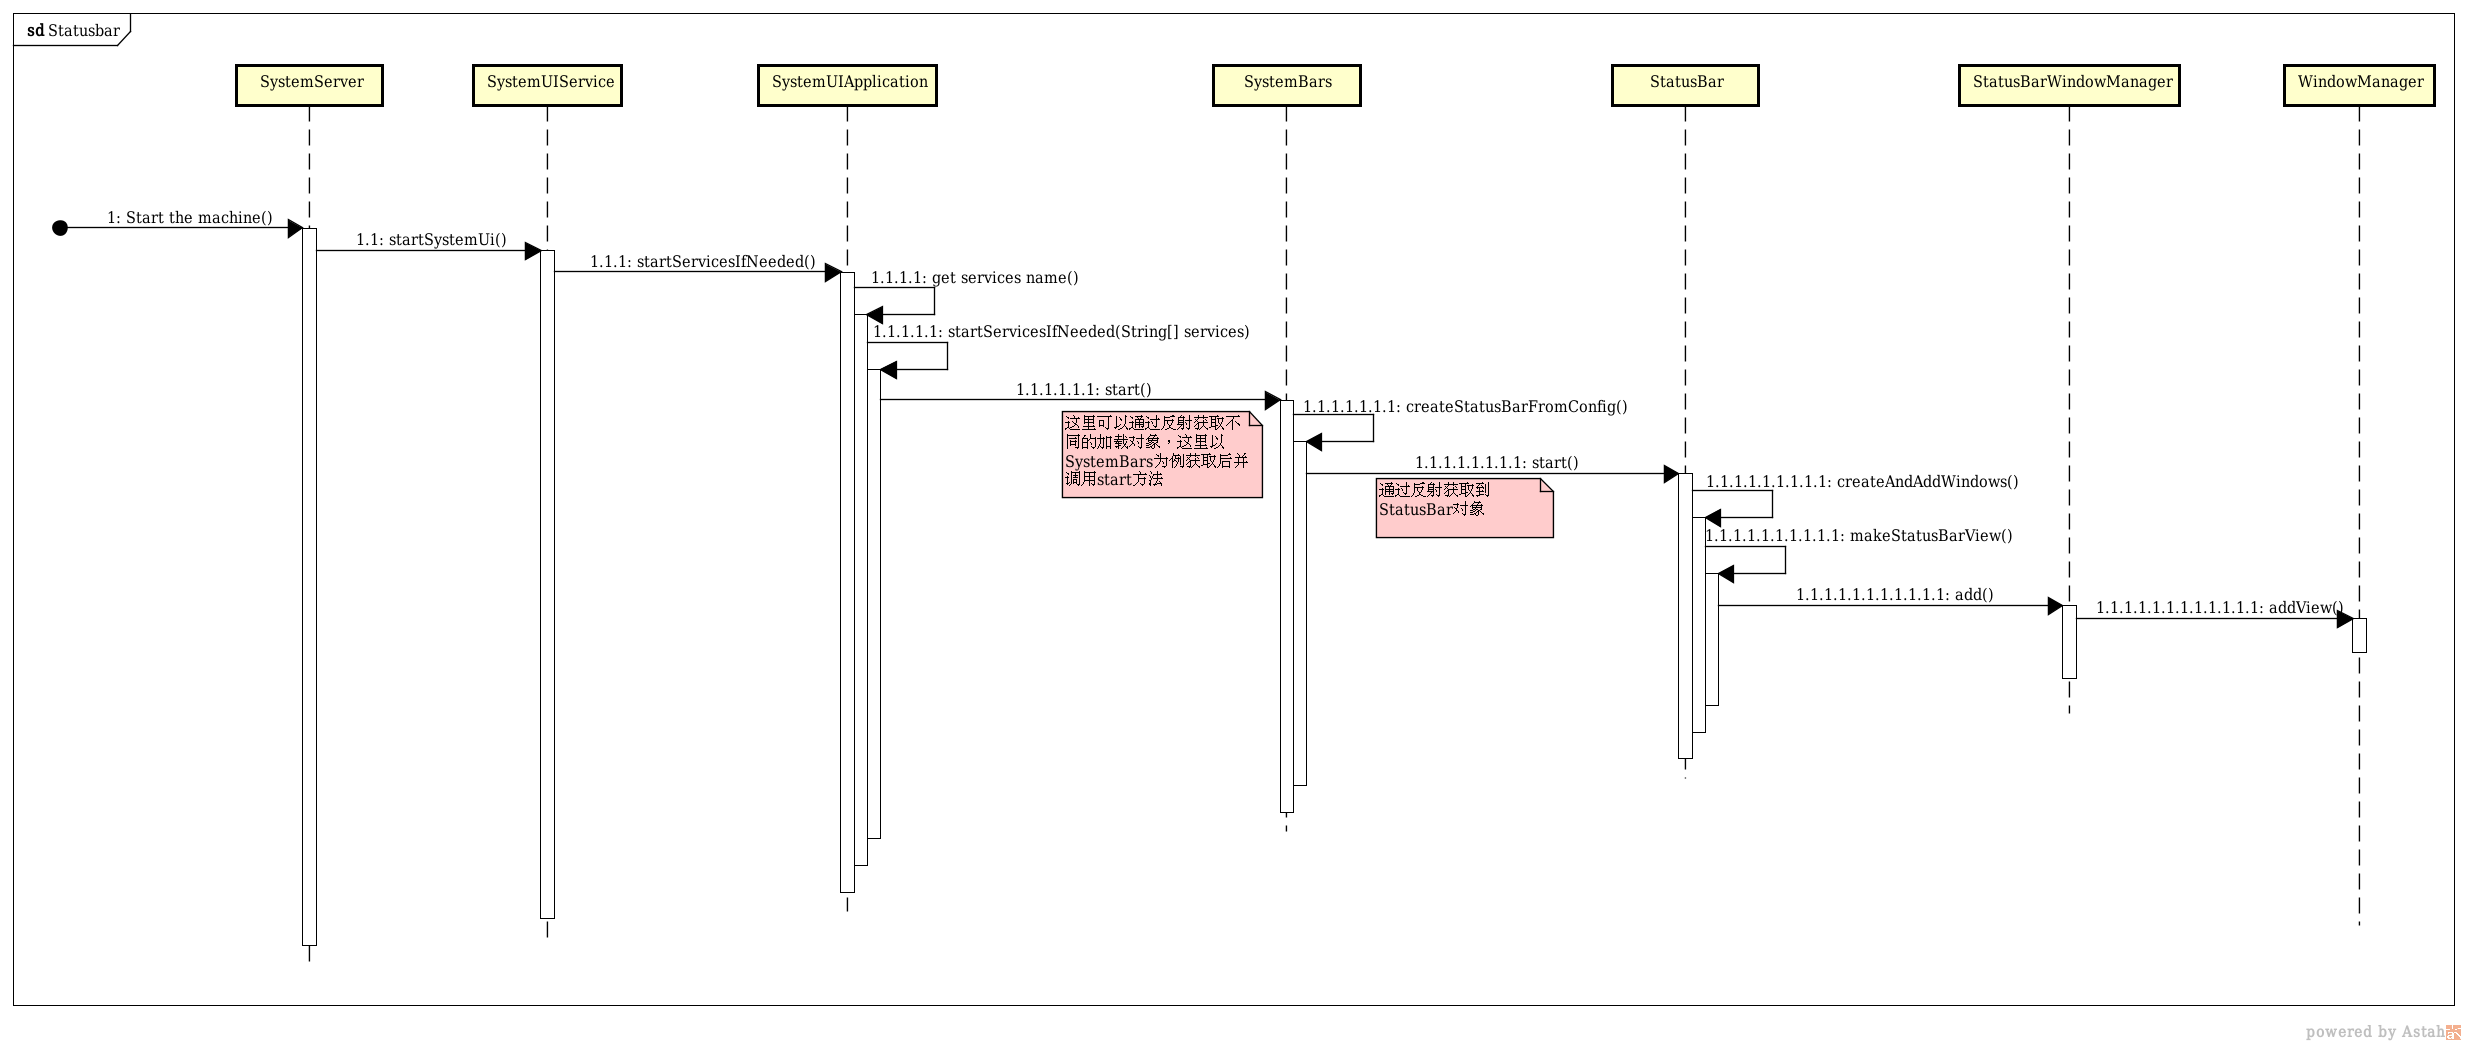
一、SystemUI的启动入口
SystemUI的加载是在Android系统启动的时候,那么我们可以知道SystemUI的入口可能是在系统启动的流程中。通过调查,发现在SyetemServer进程中开始启动系统服务,如AMS,PMS,蓝牙,窗口管理服务等,其中就包括SystemUI,那么就来看看代码中是如何实现的。
/frameworks/base/services/java/com/android/server/SystemServer.java1
2
3
4
5
6
7
8
9
10
11
12
13
14
15
16
17
18
19
20
21
22
23
24
25
26
27
28
29
30
31
32
33
34
35
36
37
38
39
40
41
42
43
44
45
46
47
48
49public final class SystemServer {
...
/**
* The main entry point from zygote.
*/
public static void main(String[] args) {
new SystemServer().run();
}
...
private void run() {
...
// Initialize native services.
System.loadLibrary("android_servers");
// Check whether we failed to shut down last time we tried.
// This call may not return.
performPendingShutdown();
// Initialize the system context.
createSystemContext();
// Create the system service manager.
mSystemServiceManager = new SystemServiceManager(mSystemContext);
mSystemServiceManager.setStartInfo(mRuntimeRestart,
mRuntimeStartElapsedTime, mRuntimeStartUptime);
LocalServices.addService(SystemServiceManager.class, mSystemServiceManager);
// Prepare the thread pool for init tasks that can be parallelized
SystemServerInitThreadPool.get();
// Start services.
try {
traceBeginAndSlog("StartServices");
startBootstrapServices();
startCoreServices();
startOtherServices();
SystemServerInitThreadPool.shutdown();
} catch (Throwable ex) {
Slog.e("System", "******************************************");
Slog.e("System", "************ Failure starting system services", ex);
throw ex;
} finally {
traceEnd();
}
...
}
在SystemServer中可以发现启动SystemServer的是zygote进程,这个不属于本文范畴先不做探讨。在SystemServer的Main函数中,调用了run(),那么跟进到run方法中(上述代码省略了一部分,只保留主线),首先初始化了native services和system context,接着创建一个SystemServiceManager对象用于后续系统服务的启动和管理。初始化完成,接下来就开始系统服务的启动,这里调用了startBootstrapServices()、startCoreServices()、startOtherServices()三个方法,从名字来看,分别是启动引导service、启动中心service、启动其他的services,这三个方法就是开启不同的系统服务的入口,那就分别进入到三个方法中。
- startBootstrapServices()
1
2
3
4
5
6
7
8
9
10
11
12
13
14
15
16
17
18
19
20
private void startBootstrapServices() {
...
Installer installer = mSystemServiceManager.startService(Installer.class);
mSystemServiceManager.startService(DeviceIdentifiersPolicyService.class);
mActivityManagerService = mSystemServiceManager.startService(
ActivityManagerService.Lifecycle.class).getService();
mActivityManagerService.setSystemServiceManager(mSystemServiceManager);
mActivityManagerService.setInstaller(installer);
mPowerManagerService = mSystemServiceManager.startService(PowerManagerService.class);
mSystemServiceManager.startService(LightsService.class);
mSystemServiceManager.startService(new OverlayManagerService(mSystemContext, installer));
...
}
在startBootstrapServices()方法中,可以发现mSystemServiceManager.startServic()为核心所在,方法中传入不同的service作为参数,以实现不同services的开启,包括AMS,PMS,LightsService等系统所需的一些小的关键服务;
- startCoreServices()
1 | /** |
同样的,代码中以mSystemServiceManager.startService()来开启服务,只不过里面的参数不同,就不做详细的探讨,继续看第三个方法;
- startOtherServices()
1
2
3
4
5
6
7
8
9
10private void startOtherServices() {
...
traceBeginAndSlog("StartSystemUI");
try {
startSystemUi(context, windowManagerF);
} catch (Throwable e) {
reportWtf("starting System UI", e);
}
}
在第三个startOtherServices()方法中,除掉开启一些系统所需的服务外,最主要的核心在于startSystemUi()方法,里面传入systemContext和WindowManagerService两个参数,也就是说我们已经找到systemUI启动的入口,那么就继续进入到startSystemUi()方法中。
- startSystemUi()
1
2
3
4
5
6
7
8
9static final void startSystemUi(Context context, WindowManagerService windowManager) {
Intent intent = new Intent();
intent.setComponent(new ComponentName("com.android.systemui",
"com.android.systemui.SystemUIService"));
intent.addFlags(Intent.FLAG_DEBUG_TRIAGED_MISSING);
//Slog.d(TAG, "Starting service: " + intent);
context.startServiceAsUser(intent, UserHandle.SYSTEM);
windowManager.onSystemUiStarted();
}
在上面代码中可以看见创建了一个Intent,然后通过设置组件名称来开启SystemUIService,至此,SystemUI才只是找到启动的入口,对于系统启动完全完成,需要进入到SystemUIService中查看详细的启动流程。
二、SystemUI开始加载
第一部分找到了SystemUIService的启动,那么就先进入到SystemUIService类中。如下所示:
/frameworks/base/packages/SystemUI/src/com/android/systemui/SystemUIService.java1
2
3
4
5
6
7
8
9public class SystemUIService extends Service {
@Override
public void onCreate() {
super.onCreate();
((SystemUIApplication) getApplication()).startServicesIfNeeded();
...
}
}
在onCreate()中获取了SystemUIApplication并且调用了它的startServicesIfNeeded()方法,那么接着就进入到SystemUIApplication类中,在SystemUIApplication类中找到startServicesIfNeeded方法,如下。
- startServicesIfNeeded()
1
2
3
4
5
6
7
8
9
10public class SystemUIApplication extends Application implements SysUiServiceProvider {
...
public void startServicesIfNeeded() {
String[] names = getResources().getStringArray(R.array.config_systemUIServiceComponents);
startServicesIfNeeded(names);
}
...
}
startServicesIfNeeded()方法中,首先创建了一个包含services的名字的数组,接着将获取的数组作为参数调用startServicesIfNeeded(String[] services)方法,这里先不看这个方法内部的构造,先来看看上面数组获取的都有哪些services,根据代码中提供的id R.array.config_systemUIServiceComponents我们在xml中找到config.xml这个文件,其中发现了一些数据,如下:
/frameworks/base/packages/SystemUI/res/values/config.xml1
2
3
4
5
6
7
8
9
10
11
12
13
14
15
16
17
18
19
20
21
22
23<string-array name="config_systemUIServiceComponents" translatable="false">
<item>com.android.systemui.Dependency</item>
<item>com.android.systemui.util.NotificationChannels</item>
<item>com.android.systemui.statusbar.CommandQueue$CommandQueueStart</item>
<item>com.android.systemui.keyguard.KeyguardViewMediator</item>
<item>com.android.systemui.recents.Recents</item>
<item>com.android.systemui.volume.VolumeUI</item>
<item>com.android.systemui.stackdivider.Divider</item>
<item>com.android.systemui.SystemBars</item>
<item>com.android.systemui.usb.StorageNotification</item>
<item>com.android.systemui.power.PowerUI</item>
<item>com.android.systemui.media.RingtonePlayer</item>
<item>com.android.systemui.keyboard.KeyboardUI</item>
<item>com.android.systemui.pip.PipUI</item>
<item>com.android.systemui.shortcut.ShortcutKeyDispatcher</item>
<item>@string/config_systemUIVendorServiceComponent</item>
<item>com.android.systemui.util.leak.GarbageMonitor$Service</item>
<item>com.android.systemui.LatencyTester</item>
<item>com.android.systemui.globalactions.GlobalActionsComponent</item>
<item>com.android.systemui.ScreenDecorations</item>
<item>com.android.systemui.fingerprint.FingerprintDialogImpl</item>
<item>com.android.systemui.SliceBroadcastRelayHandler</item>
</string-array>
在上面这些item中,可以发现都是一些我们所熟悉的类,例如VolumeUI、SystemBars、PowerUI、KeyboardUI等,也就是我们手机界面常看见的系统音量,锁屏,状态栏等,而这些UI正是SystemUI的构造部分。
在startServicesIfNeeded()方法中先将这些小部件集合在一起,然后调用startServicesIfNeeded(String[] services),那么我们可以猜测接下来是不是就要开始分别加载这些小部件并且将他们放置在相应的位置上。
- startServicesIfNeeded(String[] services);
1
2
3
4
5
6
7
8
9
10
11
12
13
14
15
16
17
18
19
20
21
22
23
24
25
26
27
28
29
30private void startServicesIfNeeded(String[] services) {
private SystemUI[] mServices;
...
mServices = new SystemUI[services.length];
...
final int N = services.length;
for (int i = 0; i < N; i++) {
String clsName = services[i];
Class cls;
try {
cls = Class.forName(clsName);
mServices[i] = (SystemUI) cls.newInstance();
} catch(ClassNotFoundException ex){
throw new RuntimeException(ex);
} catch (IllegalAccessException ex) {
throw new RuntimeException(ex);
} catch (InstantiationException ex) {
throw new RuntimeException(ex);
}
mServices[i].mContext = this;
mServices[i].mComponents = mComponents;
if (DEBUG) Log.d(TAG, "running: " + mServices[i]);
mServices[i].start();
...
}
}
首先创建了一个SystemUI数组,这个是用来装载systemUI上各个小部件,接着遍历了在startServicesIfNeeded()方法中获取的services数组,通过反射的方式,获取各个不同的systemUI的对象,最后分别调用他们的start()方法。例如循环第六次获取到的是VolumeUI的对象,最后便调用的是VolumeUI的start()方法。
到这里,正如上面的猜测,SystemUI开始加载不同位置的UI,而每个UI内部是如何加载,如何将view放置在不同的位置上的,我们继续往下看。
三、StatusBar的加载与定制化
由于SystemUI所包含的部分很多,这里就以加载状态栏StatusBar为例。上述遍历获取到了SystemBar对象,并开始调用它的start(),那么我们就进入到SystemBar类中查看它的start()。
/frameworks/base/packages/SystemUI/src/com/android/systemui/SystemBars.java1
2
3
4
5
6
7
8
9
10
11
12
13
14
15
16
17
18
19
20
21
22
23
24
25
26
27
28public class SystemBars extends SystemUI {
...
@Override
public void start() {
if (DEBUG) Log.d(TAG, "start");
createStatusBarFromConfig();
}
...
private void createStatusBarFromConfig() {
final String clsName = mContext.getString(R.string.config_statusBarComponent);
Class<?> cls = null;
try {
cls = mContext.getClassLoader().loadClass(clsName);
} catch (Throwable t) {
throw andLog("Error loading status bar component: " + clsName, t);
}
try {
mStatusBar = (SystemUI) cls.newInstance();
} catch (Throwable t) {
throw andLog("Error creating status bar component: " + clsName, t);
}
mStatusBar.mContext = mContext;
mStatusBar.mComponents = mComponents;
mStatusBar.start();
if (DEBUG) Log.d(TAG, "started " + mStatusBar.getClass().getSimpleName());
}
}
start方法中调用了createStatusBarFromConfig(),接着进入到createStatusBarFromConfig中,在这里,第一眼感觉代码有点熟悉,回想一下和上面SystemUIApplication类中startServicesIfNeeded(String[] services)加载不同systemUI的方法很像,都是使用了反射的手法,同样的首先通过id 查找到config.xml文件里的name,如下:
/frameworks/base/packages/SystemUI/res/values/config.xml1
<string name="config_statusBarComponent" translatable="false">com.android.systemui.statusbar.phone.StatusBar</string>
从这个string name可以发现最后启动的是StatusBar,也就是调用StatusBar的start()方法。
1 | public class StatusBar extends SystemUI{ |
在StatusBar类中省略了大量代码,只保留了StatusBar加载的主要流程,从Start()方法中调用createAndAddWindows()接着再调用addStatusBarWindow(),紧接着在makeStatusBarView()方法中通过inflate加载layout的方式初始化StatusBarWindow,将super_status_bar.xml里所设计的样式加载到StatusBar界面上。
也就是说,当我们碰到需要定制化SystemUI的情况下,可以自己自定义一个layout.xml,然后在这里替换掉源文件。到了第5步是在初始化StatusBarWindow后,通过StatusBarWindowManager的add()方法,将statusBarView加载到系统界面上,并设置了statusBar的高度。那么我们就进入StatusBarWindowManager类的add()方法,如下所示:
1 | public class StatusBarWindowManager{ |
可以发现StatusBar的加载真正在于WindowManager的处理,先设置好WindowManager.LayoutParams的宽高,层级TYPE,Flag等参数,然后将设置好的LayoutParams和上面传进来的mStatusBarView作为参数,调用addView()方法使View加载到相应的位置上。那么我们反过来思考下,如果将mStatusBarView换成我们自定义的View,那么结果会是什么样?
至此,StatusBar在SystemUI上的加载也就结束了,同样的道理,VolumeBar,NavigationBar等SystemUI其他部分的加载也和StatusBar的加载基本一致,这里就不再做分析。理清了上述代码,再回到文章开头看那张时序图,就可以清楚的知道SystemUI的启动流程,在此基础上,对SystemUI的定制化任务也就变得明朗起来。
参考资料: